less-known-facts-of-mahabharatham-great

less-known-facts-of-mahabharatham-great

Mahabharata is such a vast treasure house of facts and knowledge that it is impossible for anyone to know everything!

தாவனி

For your Loved ones

My AAMEC Friends

My AAMEC Friends

Power of Friendship

கல்லூரி

கல்லூரி நண்பர்களுடன்

நட்சத்திரங்களை நான் ரசித்தேன் அதுபோல் நானும் என் நண்பர்களுடன் இருக்க விரும்பியதால்...!

sachin-tendulkar-retires-famous-quotes

sachin-tendulkar-retires-famous-quotes

Commit all your crimes when Sachin is batting. They will go unnoticed because even the Lord is watching

How To Set up Android SDK for App Development?

Alright, so who's in the mood for a little Android App development? I know, I know, that's not something you can suddenly 'do' when the mood strikes you (well, maybe not for the beginners anyways). But don't worry, it's not as hard as you might think. After all, you have to start from the beginning at one point, no? One of the best thing I like about Android is the ease of development. And that includes getting the required tools, and setting them up, ready for development. Since this is the first post on the subject, that's just we're going to talk about - getting, and setting up the Android SDK for app development. Starting from the very beginning of Android App Development!
We are excited to kick off yet another series, this time on developing Android applications, and I hope you are too. We figured a change of pace was in order, since every now and then, we like to share something new and exciting with our readers. So I am sure our readers would be interested in learning to create Android apps of their own!

In this series so far;

Part 1How To Set up Android SDK for App Development?
Part 3: In progress...

Getting the Android SDK

Previously, when we were working on older versions of Android, putting the SDK together was a bit of a mess. You had to install Java, get the Eclipse IDE, install the JDK, and then download the various APIs (Android Versions) you want to test your apps on once finished. Now though, there's a much better solution.

You can now get the all-in-one ADT (Android Developer Tools) Bundle free from the Android Developers' website. It is a convenient package that contains all the thing you'll need to build your own apps. Follow the link below to download the SDK.


Click the Download the SDK button at the right, and choose your download options to download the bundle for free.

Once the zip file is downloaded, extract it, and then place the extracted folder in a convenient location. And that's it! Your Android SDK is ready to go! It doesn't even need an install! You just need to have java installed on your computer. You can get that from java.oracle.com.

Getting Started

In the extracted folder, you will see a folder named eclipse. Open up that folder, and then open eclipse.exe. You have now started the IDE, and you're now ready to code! But before we move on to that, let me quickly walk you through the interface.

When you open it up, it might look something like this.

Well, not quite like it, because I already have made a small app for the purpose of this demonstration. But the basic interface will look the same.

Towards the left side is the Package Explorer. You can track your projects in this window, and also keep track of all the files and resources in your project. It'll give you quick access.

Down below where you see ProblemsJavadoc etc, that's your multi-purpose output window. You can view warnings or errors here, and other message. It can also be used to show your program's output, since it is a native Java compiler.

On the left you have the properties window. You will see attributes for your User-Interface objects here. For example, you will see the background color, ID, text, etc of a button on your screen. Remember: You can move any of these windows around, and dock them wherever you like. Now let's take a look at the inner window.


Now, on the top, you have the file tabs. You can switch between different open files in your project easily. On the left (Form Widgets, Text Fields etc), are the different objects you can use in the drag-and-drop interface. You can use these tools to visually design your app. Note that this is only available if you have a layout XML file open. If you go over to a java file, these will disappear, and you'll see a bunch of code instead.

Another thing of note is the Device Selector. See the Nexus One written on the top? You can change that to another device from the drop-down menu. This tool will let you see how your app will look on a certain device.

While we're on the subject of devices, let me show you the Android Emulator before signing off.

Go to Window on the top, and then click on Android Virtual Device Manager. Now, click on New to create a new test platform.

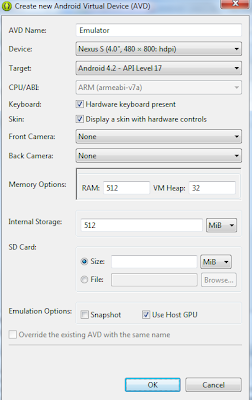
Now, choose a name for your virtual device as I have done, choose a device, and then choose an API (Android version you want to run). Assign RAM and storage as needed, and then Click on either the Snapshot or the Use Host GPU option. Since the virtual device takes some time loading up, the Snapshot option can help you start it up quickly every time by saving a snapshot of your last AVD position. Hence, this option is recommended.

Now hit Ok, and then Start. Voila! You can now see the Android Emulator start up on your computer after a couple minutes, just like the Android smartphone you (might) have.
We will be using this virtual emulator to test our Android app(s). But that's a topic for another post. Right now, feel free to look around the IDE interface, and familiarize yourself with it. 

Create Your First "Hello World" Android App

Aah, the classic "Hello World" phrase that has been the birth the of many a programs, and indeed, programmers. To learn a new language, and to start programming in that language, you first have to create the most basic program, that is, the "Hello World" program. So continuing our Android App Development series, we figured it would be a good idea to do a small tutorial on how to create your first "Hello World" Android app. We all use, and love certain Android apps. But wouldn't it be cooler to make your own Android apps? It is, after all great way to earn money!


The Android app store is growing at a rapid rate since its start. Apps is the reason why this OS is so popular. With over several hundred thousands apps, Android is one of the main players in this industry. Android app development is however a side many of us never cared or dared to approach due to its seemingly complex nature.. With the SDKs available, Android app development is not at all a hassle - rather, it's something really interesting the programmers out there. So, allow us to walk you through all the steps in creating your first Android app. You can still learn even if you're not a programmer.

Here's our Android series so far. Make sure you have set up the SDK (Part 1) before moving on wih this tutorial.

Part 2: Create Your First "Hello World" Android App
Part 3In progress

Step 1: Setting up a new project

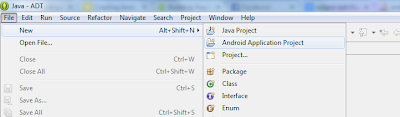
We have already talked about obtaining the SDK for Android Development. Now from the SDK folder, open up the eclipse.exe file, and create a new Android Application Project from the File menu.

Create new Android project

Step 2: Project Settings

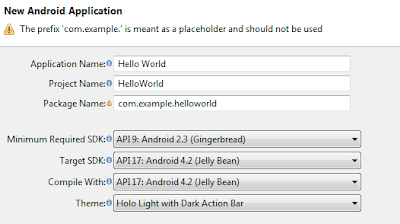
The next step is to configure your new project. Give your Application and Project a name and keep the Package name as it is. The settings shown below them need to be set carefully or your application will not work properly.

Project Settings

The Minimum Required SDK should be set to Android 2.3 (Gingerbread) unless, of course, you are specifically designing an app for an older OS. The Target SDK and Compile With option should be set to the latest API present, Android 4.2 in our case. As for the Theme, set it to your will.

Click on Next and you’ll come up with the app logo design, do it as you please and again go on the next page. There it would ask you about the layout of the main activity, set it toBlankActivity. Click Finish on the last window.

Step 3: Select test device

After the configurations, the actual app development begins. You can see the layout of your app in the centre of the screen. Start by selecting the target device by clicking on the small downward arrow beside the Nexus One text located on the bar right above the layout. You can select any sized device you desire.

Select Test Device

Step 4: Adding a widget

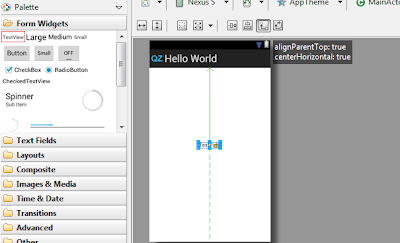
The layout of your app would be pretty much blank right now. On the left would be a Palette tab from where you can drag and drop various objects and widgets onto the screen directly. Start by dragging the TextView onto the screen.

adding an object

Step 5: Say "Hello World"!

The right most tab would be the Outline tab. Near its bottom would appear the textview’s settings after you select it from the app layout screen by left-clicking once on it. Change the third option labelled Text from 'TextView' to 'Hello World'. Ignore the warnings for now.

Say Hello World

Step 6: Testing your app

And that’s it! Your app’s ready. Easy huh? Hello World’s are always easy. Now let’s run it on an emulator. We discussed all about Android Virtual Devices (AVDs) in the previous post). For running it on your android smartphone, go directly to Step 8.

Now from the Package Explorer tab on the left of the screen, right click on your project folder, navigate to Run As and click on Android Application.

Test Your App

In the previous post, we saw how to create a virtual device. If you missed that, then you can always create a new one. Select Launch a new android virtual device and then click on Manage. Click on New and set the various attributes of your emulator. Make sure the RAM and the Internal Storage are at least 512MB.

Setting up AVD

Click on OK and close the dialogue boxes.

Step 7: Choose AVD

Reopen the Android Device Chooser and now select your new AVD and click on OK. The emulator will open up and your app will automatically load up. If it doesn't, click on the Apps icon and select your app from there. You might have to wait a bit for the app to show up.

Run on Emulator

Step 8: Run on a real device!

In order to run the App on your phone, you need the .apk file which can be obtained from the bin directory in your project folder. In our case, it is at\workspace\HelloWorld\bin\HelloWorld.apk. Copy that .apk file to your Android smartphone and install from there.

Congratulations! Your Hello World Android App development process has finally been completed successfully (I hope). With a little programming knowledge, you can actually create decent apps pretty easily using this SDK. So what would be your next Android app project? Let us know in the comments section. Cheers :)

Add Animated Flying Twitter Bird Widget to Blogger Blogs

You Might have seen animated flying Twitter bird on many Blogs and Page. Well this is a Popular Widget.and Also it is Very easy to install.Wherever You Scroll on the Page the Twitter Bird Follows you on the Page.So Add this Simple Widget and Add Some Uniqueness to your Blog.


How to add Animated Flying Twitter Bird:.


1. Go to Blogger Dashboard > Design > Edit Html.
2. Now Search for </body> tag and Paste the Below Code Above it.
3. Save Your Template.


<!-- Twitter Bird Widget for Blogger by Technouniversity -->
<script type="text/javascript" src="http://technouniversityworldjavascript-testing.googlecode.com/files/tuwtwitterbird.js">
</script>
<script type="text/javascript">
var twitterAccount = "barani776";
var tweetThisText = " <data:blog.pageTitle/> : <data:blog.url/> ";
tripleflapInit();
</script>
<span style="font-size:11px;position:absolute;"></span>
<!-- Twitter Bird Widget for Blogger by computer entertainment-->
Now Change My Twitter Username With Your Username That's It.Now You're Done.

How To Make A Marquee Effect (Running Text) In Blog

What is marquee? Marquee is a HTML program to make a running/moving text. Many people like this, because by wearing marquee in our blog, the blog will be attractive. Before I tell how to make it, it's better for you to know some HTML code in marquee.

Marquee can be made with tag <marquee>. . .</marquee>


bgcolor="color" (set the background color)

direction="left/right/up/down(set the direction)

behavior="scroll/side/alternate(set the characteristic of text)

tittle="message" (your message that will be display)

scrollamount="number" (set the speed of text)

scrolldelay="number" (set the delay time)

loop="number" (set the number of loops)

width="number(set the width of text background)

height="number" (set the height of text background)

NOTE : Change the blue word

Confuse? I give you some examples, see below

<marquee align="center" direction="right" height="70" scrollamount="2" width="100%">
Give us a comment
</marquee>

Give us a comment


<marquee align="center" direction="left" height="70" scrollamount="3" width="100%" behavior="alternate">
Follow us
</marquee>

Follow us


<marquee bgcolor="RED" width="100%" scrollamount="3" behavior="alternate">
Get many tricks for your blog
</marquee>

Get many tricks for your blog


<marquee onmouseover="this.stop( ) " onmouseout="this.start ( ) " scrollamount="2" drection="up" width="100%" height="100" align="center">
Follow us
</marquee>
Follow us


For another marquee effect, you can change the HTML code and make your own attractive marquee effect! 

HOW TO ENJOY WINDOWS 8 VIEW IN WINDOWS 7

Hello friends, lets see how to enjoy windows 8 view in windows 7. You can do it very easily & fast. You have to just download a transform pack of Windows 8, don’t worry friends this pack is free of cost and only of 19.45 MB. Just follow these steps to make this trick working


First of all download WINDOWS 8 UX PACK 5.0
1x1.trans HOW TO ENJOY WINDOWS 8 VIEW IN WINDOWS 7


STEP 2.-
Now double click on it & install it on your pc..

STEP 3.-
Now just reboot your pc and enjoy.

HOW TO CHECK YOUR ANTIVIRUS IS REAL OR FAKE

1.)
First of all press WINDOWS KEY + R to open run command and write NOTEPAD here to open notepad
.
2.)
Now copy and paste the below code into your notepad.
X5O!P%@AP[4PZX54(P^)7CC)7}$EICAR-STANDARD-ANTIVIRUS-TEST-FILE!$H+H*

3.)
After that press CTRL + S to save this file, here save this file as W2H.vbs on yourDESKTOP
4.)
If your antivirus is real then it can allow you to save this file on your desktop i.e. It will detect as virus and delete it and if your antivirus is fake then it will allow you  to save this file.

India Learning Movement


Get Lifetime Access to All 12 Courses @ just Rs 2499 (Rs 15,000 84% Discount)


Here is your dream chance to Learn ALL Twenty19 Online courses and get the skills the Industry wants-
  1. 1. You get LIFETIME access to ALL Twenty19 online courses (listed below)
  2. 2. You pay just Rs. 2499 only. (84 % discount. Actual price Rs.15,000)
  3. 3. This offer is available only till 6th Oct'13

Apple iOS 7: Tips and tricks


Here are five things to know if you download the software on one of Apple's older mobile devices starting Wednesday or buy a new iPhone starting Friday. The update is available for free for the iPhone 4, 4S and 5 models, the iPad 2 and later, the iPad Mini and the iPod Touch released last year. You'll need about 3 gigabytes of free storage. 


Tip one: Control Center and Swipes
Many of the improvements added to iOS 7 are delivered after swiping from various edges of the screen. This redesign is meant to make it easier to navigate, but there is no guide for knowing when and how to swipe. Fortunately, you can still use an iPhone the traditional way, by tapping on an icon or button, even if you don't learn all the new ways to swipe. 

As a general rule of thumb, keep swiping from various edges to see what happens. If you discover something neat, remember it for next time. Swiping may produce different results if you're in the lock screen, the home screen or an app. 

Here's a guide to the basic swipes: 

*From the lock screen, swipe up from the bottom right corner to access the camera. This is a holdover from iOS 6. 

*Whether locked or unlocked, swipe up from anywhere else along the bottom edge to get the Control Center. It gives you easy access to frequently accessed settings such as Airplane Mode and Wi-Fi. It also gets you to key apps such as the flashlight feature and the clock, for timing how long the turkey needs to be in the oven. There's a volume control, but only for audio and video playback. You need the volume buttons for the ringer and alerts. 

*Swipe down from the top edge to get the Notification Center. You'll see the day's highlights, including the weather, appointments and stock quotes. Tap on "All" or "Missed" near the top to get recent notifications from Gmail, Facebook and other services. 

*Swipe down from anywhere else on the screen to get a search box. 

*From various Apple apps, try swiping from the left or the right. Not every app will respond, but many will. With the Safari browser, for instance, you can use the left and right swipes in place of the back and forward buttons. 

Tip two: Organizing and sharing photos
The new Photos app organizes your photos into moments, based on when and where you took the photos. Several moments will be grouped into a collection, such as a vacation to Europe. Collections will then be grouped by year. It's all automated, so you can't reorganize shots if you would rather break a collection into two. But it's better than having hundreds of unorganized photos. 

From any moment, collection or year, click on the header on top of the photos to pull out a map showing all the places you've been, with the number of shots taken at each. You can share entire moments, by hitting "Share" on the right side of that header. A menu should pop out from the bottom. It's tricky because it's easy to miss and hit "Select" above it instead. 

Once you have the moment or set of photos chosen, another menu will pop out from the bottom, giving you such choices as sharing by email, Facebook, Flickr or text messaging. 

Tip three: Ask Siri
Frustrated with Siri's inability to hear what you're trying to say? Instead of repeating yourself over and over, you can click "tap to edit" to make the change manually. You shouldn't have to with voice search, but fixing one letter is still easier than having to type in the entire phrase. 

Just for fun, you can give Siri a sex change by going to the settings, choosing "General," then "Siri," then "Voice Gender." You can now use Siri to change phone settings and return recent calls. And Siri will speak out turn-by-turn directions when walking. Before, the vocal instructions were limited to driving directions in Maps. 

Tip four: Freebies
Apple's new streaming music service, iTunes Radio, is easy to find. Click on the Music icon at the bottom of each home screen, then choose "Radio" at the bottom. Create music stations by choosing some genres you like. Then fine-tune your picks by hitting the star when a tune is playing. You can ask the service to play more songs like it or remove that song from future playlists entirely. You can also create new stations based on specific songs or artists. The service will try to find other songs like them. 

Best of all, it's free. Just prepare to put up with some ads, unless you subscribe to Apple's iTunes Match for $25 a year. 

Meanwhile, you might qualify for some free apps - Pages for word processing, Numbers for spreadsheets, Keynote for presentations, iPhoto for photo editing and iMovie for movie editing. They usually cost $5 or $10 each. To qualify, you need to buy a new iPhone, iPad or iPod Touch. The offer is retroactive to Sept. 1. Once a new device is activated, the app can be downloaded for free to other devices on the same account, as long as the device is upgraded to iOS 7. 

Tip five: Fingerprinting
With the new fingerprint ID system on the iPhone 5S, there's no longer a reason to avoid protecting your phone with a passcode. I know passcodes can be very disruptive. I've often lost my train of thought before I could get to an app to jot something down. But your fingerprint now bypasses the need to type in a four-digit code in many situations. 

It's easy to set up. The iPhone will walk you through scanning one finger when you set up the phone. You can scan four more fingers - yours or someone else's - by going to the settings. Go to "General," then "Passcode & Fingerprint." 

I'm still confronted with passcode screens, especially when I need to authenticate an app purchase. It took me a few days to realize that even though you're asked for a passcode, the fingerprint usually works unless the phone specifically tells you otherwise. 

One more thing: The screen needs to be on for the fingerprint sensor to work. To save a step, just press on the home button firmly and let the button pop back up. But keep your finger lightly touching the button's surface. The hard press will activate the screen, and the light touch will unlock the phone.